

Import Terraform Configuration
Seamlessly Integrate Existing Infrastructure with Terraform: A Hands-On Guide to Importing Terraform Configuration


Introduction
Terraform supports bringing your existing infrastructure under its management. By importing resources into Terraform, you can safely and consistently manage your infrastructure using a predictable workflow.
When you create new infrastructure with Terraform, you usually use the following workflow:
Write Terraform configuration that defines the infrastructure you want to create.
Review the Terraform plan to ensure the configuration will result in the expected infrastructure.
Apply the configuration to have Terraform create your infrastructure.
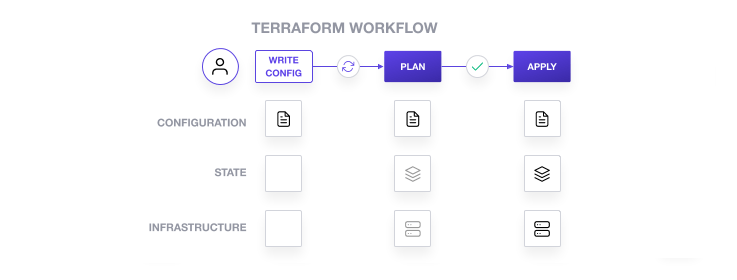
Terraform stores information about your infrastructure in a state file. To update your infrastructure, you first modify your configuration and then use Terraform to plan and apply the required changes. Terraform uses the data in your state file to determine the changes it needs to make to your infrastructure.
You can use the import command to migrate existing resources into your Terraform state file. The import command does not currently generate the configuration for the imported resource, so you must write the corresponding configuration block to map the imported resource to it.
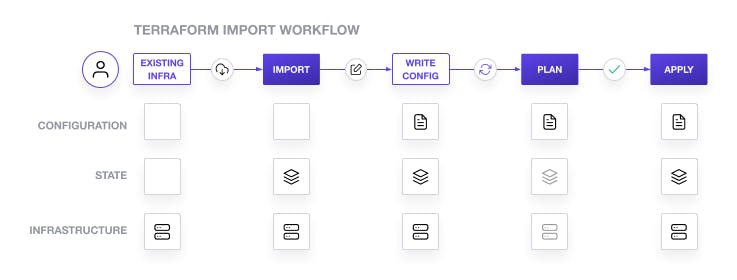
Importing infrastructure involves five steps:
Identify the existing infrastructure you will import.
Import infrastructure into your Terraform state file.
Write Terraform configuration that matches that infrastructure.
Review the Terraform plan to ensure the configuration matches the expected state and infrastructure.
Apply the configuration to update your Terraform state.
You will create a Docker container with the Docker CLI. Then, you will import the container into a new Terraform project and begin using the Terraform workflow to modify the container.
Importing infrastructure manipulates Terraform state and can corrupt the state file for existing projects. Make a backup of your
terraform.tfstatefile and.terraformdirectory before using Terraform import on a real Terraform project, and store them securely.
Prerequisites
You can complete this tutorial using the same workflow with either Terraform OSS or Terraform Cloud.
I've used Terraform Cloud. I will suggest beginners start with Terraform OSS.
Create a Docker container
Create a container named hashicorp-learn using the latest NGINX image from Docker Hub, and publish that container's port 80 (HTTP) to your local host system's port 8080.
$ docker run --name hashicorp-learn --detach --publish 8080:80 nginx:latest
Unable to find image 'nginx:latest' locally
latest: Pulling from library/nginx
3f9582a2cbe7: Pull complete
9a8c6f286718: Pull complete
e81b85700bc2: Pull complete
73ae4d451120: Pull complete
6058e3569a68: Pull complete
3a1b8f201356: Pull complete
Digest: sha256:aa0afebbb3cfa473099a62c4b32e9b3fb73ed23f2a75a65ce1d4b4f55a5c2ef2
Status: Downloaded newer image for nginx:latest
1839b5115dbcd36e95fcf81a28ef8d16273e8cb7a1c98b1ee883e453c738593b
The
--detachoption means that the container will run in the background, and the console will return to the user immediately after the container starts.The
--publishoption maps the container's internal port 80 to the host's port 8080, allowing external access to the web server running inside the container.
Use docker ps to verify that the container is running.
$ docker ps --filter="name=hashicorp-learn"
Visit the address 0.0.0.0:8080 in your web browser to see the NGINX default index page.
Now you have a Docker image and container to import into your project and manage with Terraform.
Initialize configuration
Now, clone the example repository for this tutorial.
$ git clone https://github.com/hashicorp/learn-terraform-import.git
This repository consists of a directory that organizes Terraform configuration across three files:
terraform.tfconfigures the Terraform and provider versionsmain.tfconfigures the Docker providerdocker.tfwill contain the configuration for the Docker container you import
For Terraform Cloud Users:
Because this uses a Docker container as the example resource to import, you must use local execution with Terraform Cloud. This workflow lets you run Terraform operations locally, letting Terraform access containers and resources on your local machine. It then stores your state file in Terraform Cloud for easy collaboration and versioning.
To enable local execution, navigate to your new learn-terraform-import workspace in Terraform Cloud. In the workspace's General settings, select Local under Execution Mode, then click Save settings.
Import the container into Terraform
Define an empty docker_container resource in your docker.tf file, which represents a Docker container with the Terraform resource ID docker_container.web.
resource "docker_container" "web"{}
Next, run docker ps to find the name of the container you want to import - in this case, the container you created in the previous step.
$ docker ps --filter="name=hashicorp-learn"
Now run terraform import to attach the existing Docker container to the docker_container.web resource you just created. Terraform import requires this Terraform resource ID and the full Docker container ID. In the following example, the command docker inspect --format="{{.ID}}" hashicorp-learn returns the full SHA256 container ID.
$ terraform import docker_container.web $(docker inspect --format="{{.ID}}" hashicorp-learn)
- The
$(docker inspect --format="{{.ID}}" hashicorp-learn)part of the command is used to retrieve the unique ID of the Docker container that we want to import. This is done by running thedocker inspectcommand and using the--formatoption to extract just the container ID.
The ID
terraform importrequires to vary by resource type. You can find the required ID in the provider documentation for the resource you wish to import. For this example, consult the Docker provider documentation.
Review the contents of your state file by running terraform show.
$ terraform show
Importing the container pulled all of the displayed data about the resource into your state file under the resource ID you specified docker_container.web. However, Terraform import does not create the configuration for the resource.
Create configuration
In order to continue managing the imported container using Terraform, you must also create a corresponding configuration for it.
Run terraform plan Terraform shows errors because your configuration does not have the required image and name arguments for the container resource. Terraform cannot generate a plan for a resource that is missing the required arguments.
$ terraform plan
Error: Missing required argument
│
│   on docker.tf line 2, in resource "docker_container" "web":
│    2: resource "docker_container" "web"{}
│
│ The argument "name" is required, but no definition was found.
╵
╷
│ Error: Missing required argument
│
│   on docker.tf line 2, in resource "docker_container" "web":
│    2: resource "docker_container" "web"{}
│
│ The argument "image" is required, but no definition was found.
There are two approaches you can use to update the configuration in docker.tf to match the state you imported:
Accept the entire current state as-is. This approach is often faster but can lead to overly verbose configuration since not all attributes in the state are necessary for the configuration.
Cherry-pick required attributes into configuration one at a time. This creates a more manageable configuration but requires an understanding of which attributes are required.
You may find both of these methods useful in different circumstances. But we'll be using the Cherry-pick method.
To cherry-pick the configuration for your Docker container, you will add the missing required attributes which caused the errors in your plan. Terraform cannot generate a plan without all of the required attributes for your resource.
Run terraform show to find the correct values for the missing image and name attributes.
$ terraform show
Copy the values into the "docker_container" "web" block in docker.tf. Replace the image ID with the value from the output of terraform show, not the one shown here.
resource "docker_container" "web" {
  name  = "hashicorp-learn"
  image = "sha256:904b8cb13b932e23230836850610fa45dce9eb0650d5618c2b1487c2a4f577b8"
}
This will resolve the errors from missing required attributes, but your configuration will not match the Terraform state or Docker container.
Run terraform plan again to see those differences. The plan will succeed, but applying it would destroy the existing container and add a new one with a different configuration, instead of bringing the existing container under Terraform's control.
$ terraform plan
Your configuration is missing values for env and ports. The values loaded from the state indicate that Docker exposes the container's port 80 as port 8080 in your host system. The output of Terraform plan shows that changes to the env and port attributes "forces replacement" of the container.
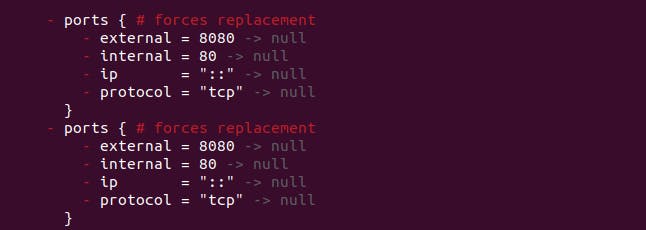
Resolve this by adding the env and ports attributes to the docker_container.web resource in docker.tf.
resource "docker_container" "web" {
  name  = "hashicorp-learn"
  image = "sha256:904b8cb13b932e23230836850610fa45dce9eb0650d5618c2b1487c2a4f577b8"

  env  = []

  ports {
    external = 8080
    internal = 80
  }
}
You do not need to include values for ip or protocol because these attributes are optional, and the current state is the same as their default values.
Run terraform plan again to compare your new configuration to the state you imported earlier:
$ terraform plan
Notice that the plan indicates that Terraform will update the container in place to add the attach, logs, must_run, and start attributes.
Terraform uses these attributes to create Docker containers, but Docker does not store them. As a result, terraform import did not load their values into the state. When you plan and apply your configuration, the Docker provider will assign the default values for these attributes and save them in the state, but they will not affect the running container.
Apply the changes and finish the process of syncing your Terraform configuration and state with the Docker container they represent.
$ terraform apply
At this point, running terraform plan or terraform apply will show no further changes, and you can now manage the container with Terraform as you would any other resource.
Limitations and other considerations
There are several important things to consider when importing resources into Terraform:
Terraform import uses the current state of your infrastructure reported by the Terraform provider. It cannot determine:
the health of the infrastructure.
the intent of the infrastructure.
changes made to the infrastructure that are not in Terraform's control, such as the state of a Docker container's filesystem.
Importing involves manual steps which can be error prone, especially if the operator lacks context about the purpose and history of the infrastructure.
Importing manipulates the Terraform state file. You may want to create a backup before importing new infrastructure.
Terraform import does not detect or generate relationships between infrastructure.
Terraform import does not detect which default attributes you can skip setting.
Not all providers and resources support Terraform import.
Importing a resource into Terraform does not mean that Terraform can destroy and recreate it. For example, the imported infrastructure could rely on other unmanaged infrastructure or configuration.
If you store your state in a remote backend, you may need to set local variables equivalent to the remote workspace variables. The
importcommand always runs locally and cannot access data from the remote backend, unlike commands likeapply, which run inside your Terraform Cloud environment.
Thank you so much for taking your valuable time for reading.
I took the initiative to learn in public and share my work with others. I tried my level best in squeezing as much information as possible in the easiest manner. Hope you learned something new today :)
Any feedback for further improvement will be highly appreciated!