
Microservice Architecture and System Design with Python & Kubernetes | Auth
Building Robust and Scalable Systems with Microservice Architecture: An In-Depth Exploration of System Design

I am an Engineering undergrad student who is passionate about technology and its impact on the world. I am currently learning and writing about DevOps, a field that combines software development and IT operations to deliver software quickly and efficiently. My technical skills are backed by a strong understanding of software development, IT operations, and automation.
Apart from technology, I have a creative side as well. I enjoy producing music and experimenting with different sounds and beats. I am also a huge fan of basketball, F1 racing, and MMA, and I often spend my free time watching and analyzing games, races, and techniques. Additionally, I enjoy writing blogs as a way to express my thoughts and share my knowledge with others. Overall, I am a well-rounded individual who is constantly seeking new challenges and opportunities to learn and grow.
Architecture 📐

Tools and Languages Used 🧰
Python
Docker
Kubernetes
MongoDB
MySQL
RabbitMQ
Working ❇️
The Client uploads the video to be converted, the video will first hit our API gateway.
API gateway will store the video in MongoDB and put a message in our Queue, letting downstream services know that there is a video to be processed on MongoDB.
The Converter service will consume the message from the Queue. It will then get the Video ID from the message and pull that video from MongoDB convert it to mp3 and store the mp3 in MongoDB and then put a new message on the Queue to be consumed by the Notification service.
The Notification service will send an email to clients letting them know the file is ready to be downloaded.
The Client will use the Video ID acquired from the Notification service and his/her JWT(JSON Web Token) to make a request to the API gateway to download the mp3 then the API gateway will pull the mp3 from MongoDB and serve it to The Client.
Auth Service 🔐
server.py 🐍

import JWT, datetime, os -> JWT is our actual auth | datetime is used to set expiration on our token | os is used so that we can use an environment variable to configure our MySQL connection.
from flask import FLASK, request -> We are using Flask to create our server. | request.
from flask_mysqldb import MySQL -> Allows us to Query our MySQL database.
server = Flask(__name__) -> This is going to configure our server so that requests to specific routes can interface with our code.
mysql = MySQL(server) -> This MySQL object is going to make sure that our application can connect to our MySQL database and query the
database.
server.config["MYSQL_HOST"] = os.environ.get("MYSQL_HOST") -> Our server object has a config attribute which is essentially a dictionary that we can use to store configuration variables. | os.environ.get("MySQL") is going to get the MySQL host from our environment.
This and following other server.configs is going to be the configuration for our application and the variables that we use to connect to our MySQL database.
@ server.route("/login", methods=["POST"]) -> This defines the "/login" endpoint for a Flask server. When an HTTP POST request is made to the "/login" endpoint,
the following code will be executed.
auth = request.authorization -> authorization attribute provides the credentials from a basic authentication scheme, so when we send a request to the login route, we need to provide a basic authentication scheme that will contain essentially a username and a password, and the request object has an attribute that gives us access to that.
if not auth: return "Missing Credentials", 401 -> If the authorization information is missing, the code returns a message "Missing Credentials" and an HTTP status code 401 (Unauthorized).
So the way login route is going to work is, auth service is going to have its own MySQL database and we're going to check a user table within that database and the user table should contain a username and password for the users that are trying to log in or trying to access the API .
cur = mysql.connection.cursor() -> This creates a database cursor using the MySQL connection created earlier in the code.
res = cur.execute( "SELECT email, password FROM user WHERE email=%s", (auth.username,) ) -> Using the cursor defined above we are executing an SQL query to retrieve the email and password from the user table with whatever email passed in the request and we are using email for our username.
if name == "__main__": -> It is executed only if the script is run as a standalone program.
server.run(host="0.0.0.0", port=5000) -> we want our server to run on port "5000" and configure the host parameter to allow our application to listen to any IP address.
Why host="0.0.0.0"? and What if it's not "0.0.0.0? ❓
In easy terms, if we don't set this host parameter like so the default is going to be localhost which means that the server is only accessible from our own computer or from localhost and our API wouldn't be available externally.
Briefly explain, any server is going to need an IP address to allow access from outside of the server so in our case the server is a Docker container and our application will be running within that container when we spin up our Docker container it will be given its own IP address we can then use that IP address to send requests to our Docker container but this alone isn't enough to enable our flask application to receive those requests we need to tell our flask application to listen on our container's IP address so that when request gets into our containers IP our application can receive those requests so this is where the host config comes in the play host is the server that is hosting our application in our case the server that is hosting our flask application is the docker container so we need to tell our flask app to listen on our Docker containers IP address but a Docker container's IP address is subject to change so instead of setting it to the static IP address of our Docker container we set it to this "0.0.0.0" IP address which is kind of like a wild card that tells our our flask app to listen on any and all of our Docker containers IP addresses and if we don't configure this it will default to just localhost which is the loopback address and localhost is only accessible from within the host therefore outside requests sent to our Docker container would never actually make it to our flask app because the loopback address isn't publicly accessible.
Authentication schemes Docs 📃
init.sql
We are creating a USER for our auth service and we are giving that user a username and a password then we are creating a MySQL database called auth which is going to be the database for our auth service and we are granting the USER privileges to the database and we are creating a table within that database called user not to be mistaken with the USER that we're creating within the MySQL database and the user table is used to store users that we want to give access to our API and we are creating an initial user which will go in our database and will have access to our Gateway API.

Basic commands to work with MySQL database 💽
show databases; -> Displays a list of all databases on the MySQL server.
use auth; ->Selects the auth database as the default database for subsequent commands.
show tables; -> Displays a list of all tables in the selected database.
describe user; -> Displays information about the columns in the user table, such as the name, data type, and constraints of each column.
select * from user; -> Retrieves all columns and all rows from the
usertable.
Dockerfile 🐳
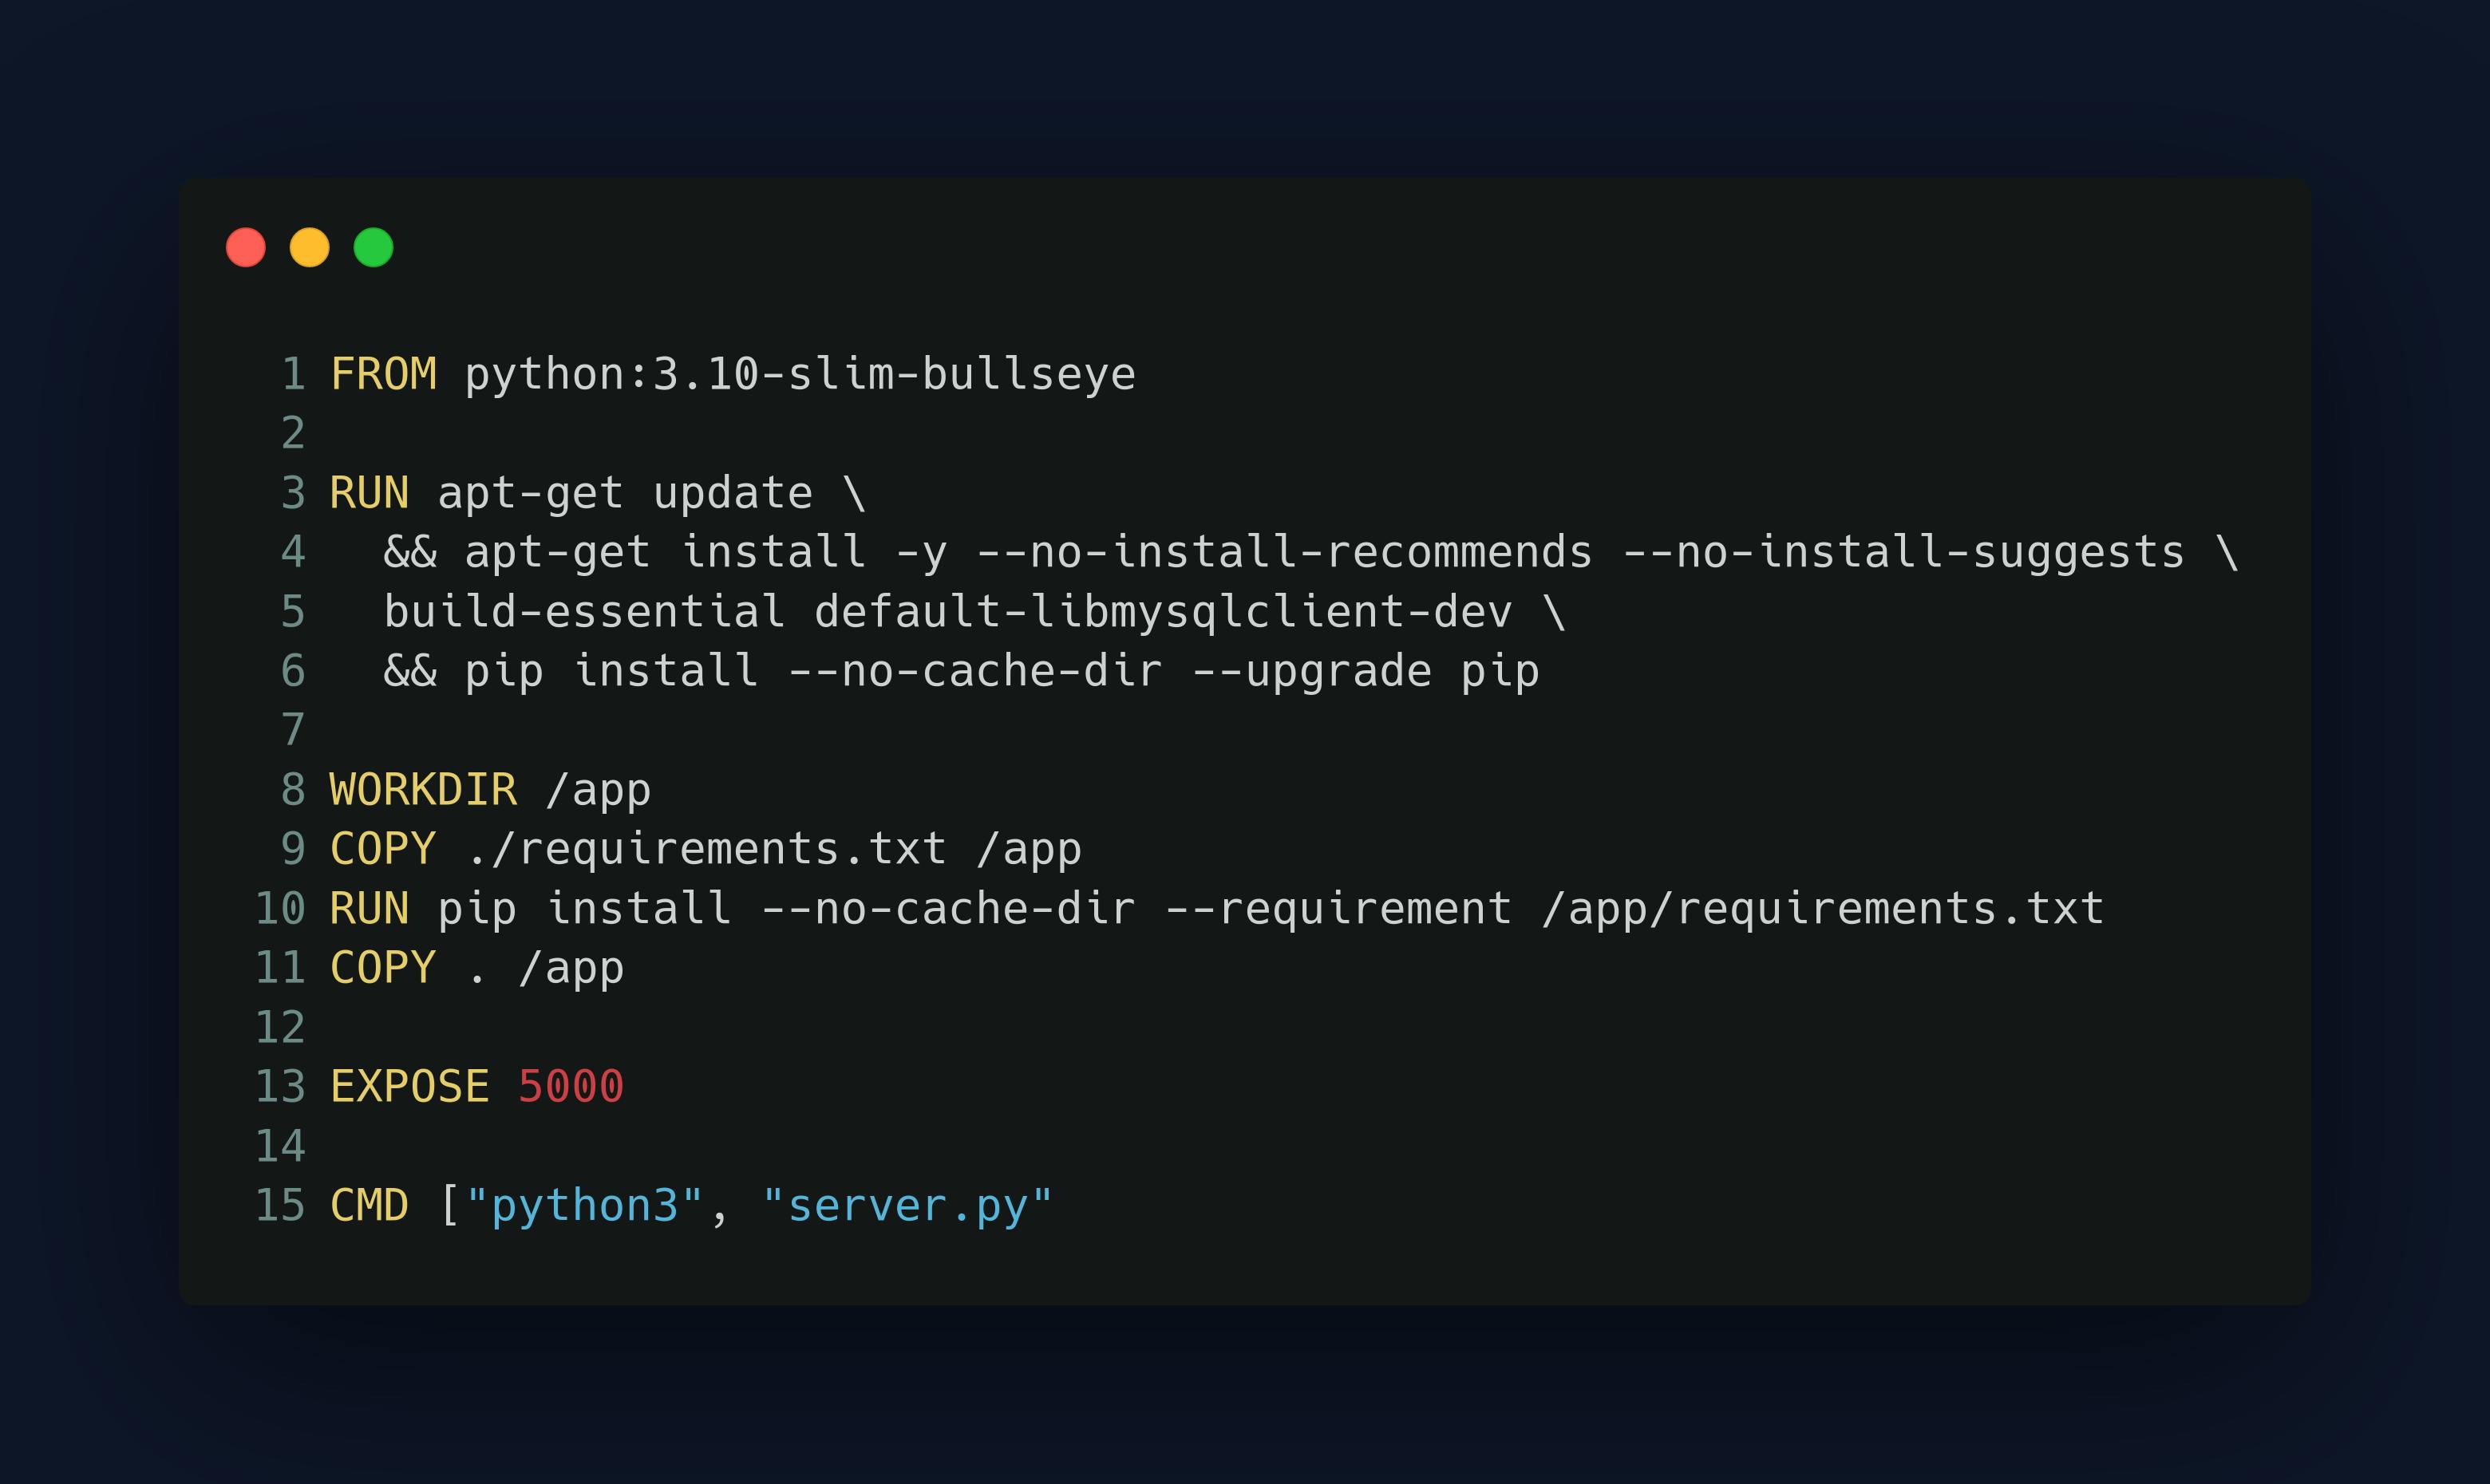
Each instruction in a Docker file results in a single new image layer being created which means that the following instructions image layer will be built on top of the previous instructions image layer. so that means the FROM instruction creates a layer and then the RUN instruction creates a new layer on top of the previous layer that was built from the FROM instruction and this continues until we reach the end of our Docker file.
Manifest
All the codes inside this are our Kubernetes Configuration codes. Clicking on the name of the files will take you to its API reference.
auth-deploy.yaml
Deployment enables declarative updates for Pods and ReplicaSets.
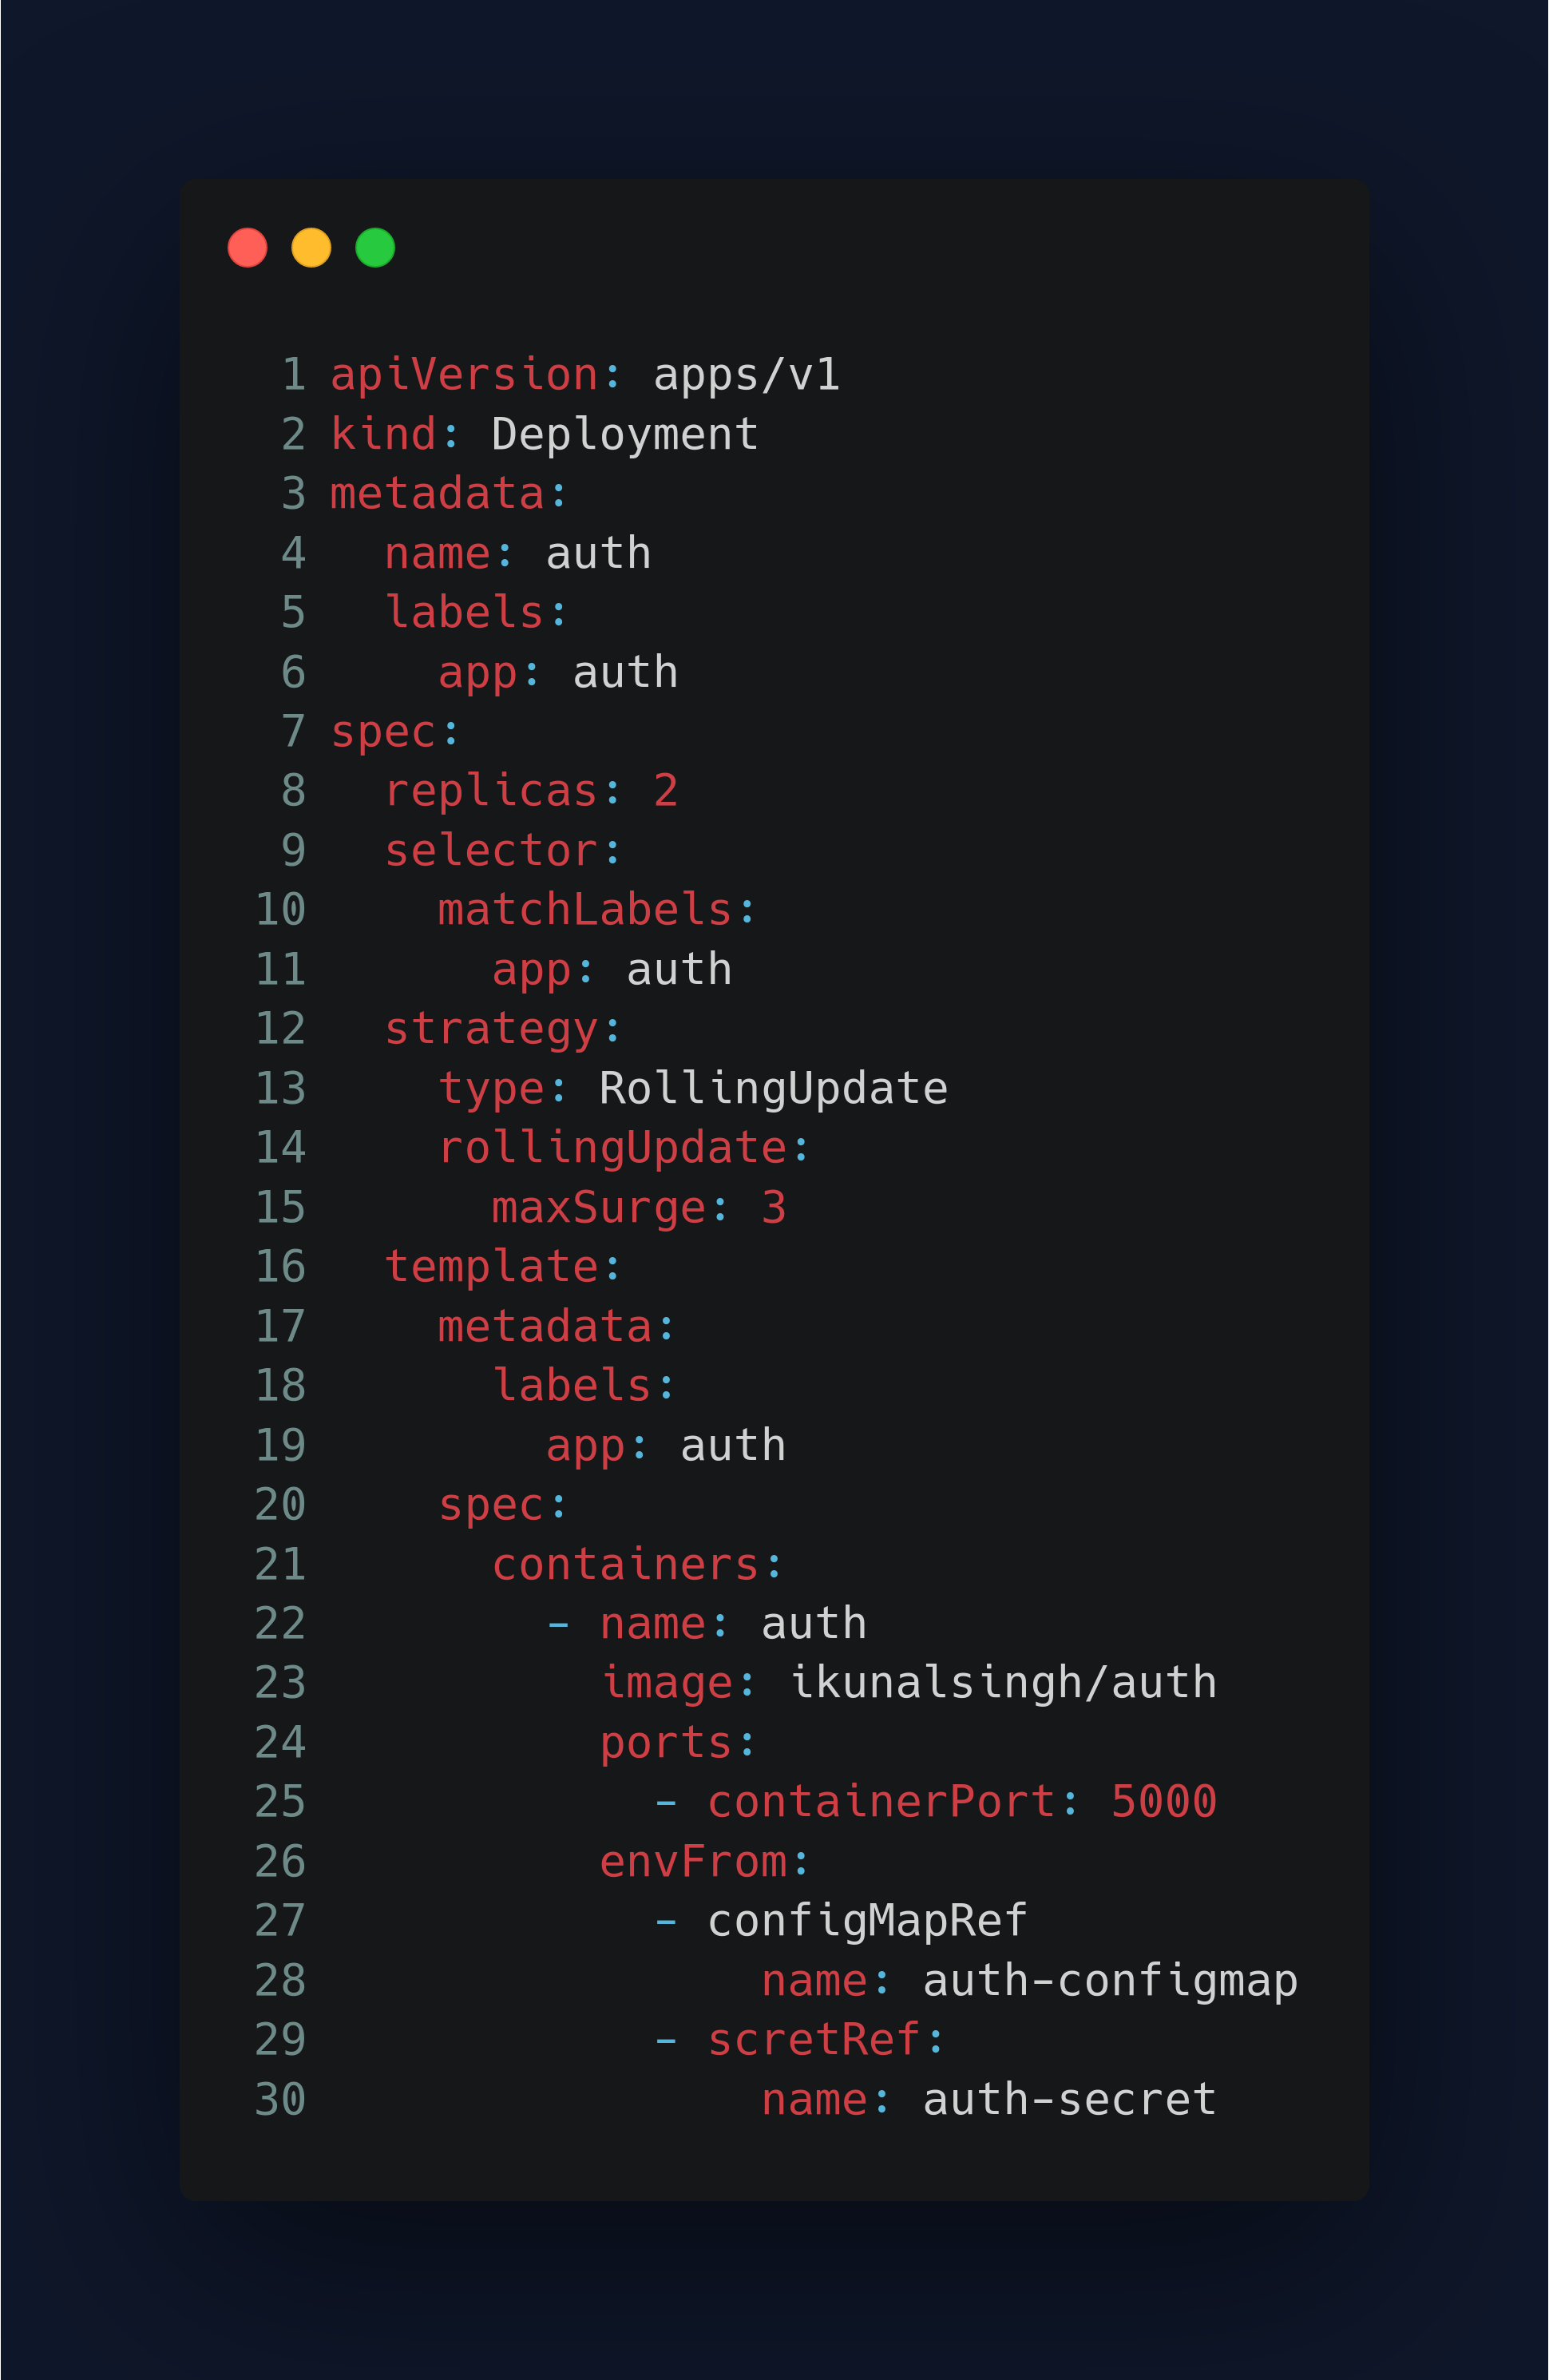
Line-7, spec: The specification of the desired behavior of deployment.
Line-8, replicas: Number of desired pods.
Line-9, selector: Existing replica-set whose pods are selected by this will be the one affected.
Line-12, strategy: Strategy to use to replace the existing pods with the new ones.
Line-15, maxSurge: Maximum number of pods that can be scheduled above the desired number of pods.
Line-16, template: Defines the pods that will be created from this pod template.
Line-20, spec: The data pod should have when created from the template.
Line-26, envFrom: List of sources to populate environment variable in the containers.
configmap.yaml
Going to set environment variables within our container.
In other words, if we were to run the environment command within that container all of these variables and their values are going to be present within the container.

- MYSQL_HOST: host.minikube.internal :- We are using our MySQL server. So we need to reference that server from within our Kubernetes cluster and Minikube gives us a way to access our host, the Clusters hosts via this host.mininkube.internal because within the cluster we're kind of in our own isolated network. So since our MySQL server is just deployed to our local host from within the cluster we wouldn't be able to just use localhost we need to access the system that's hosting the cluster and that's what this host.mininkube.internal is for.
secret.yaml
A file that is used to store sensitive information for our Kubernetes applications. We use this file to keep our secrets hidden from public view and ensure the security of our applications.
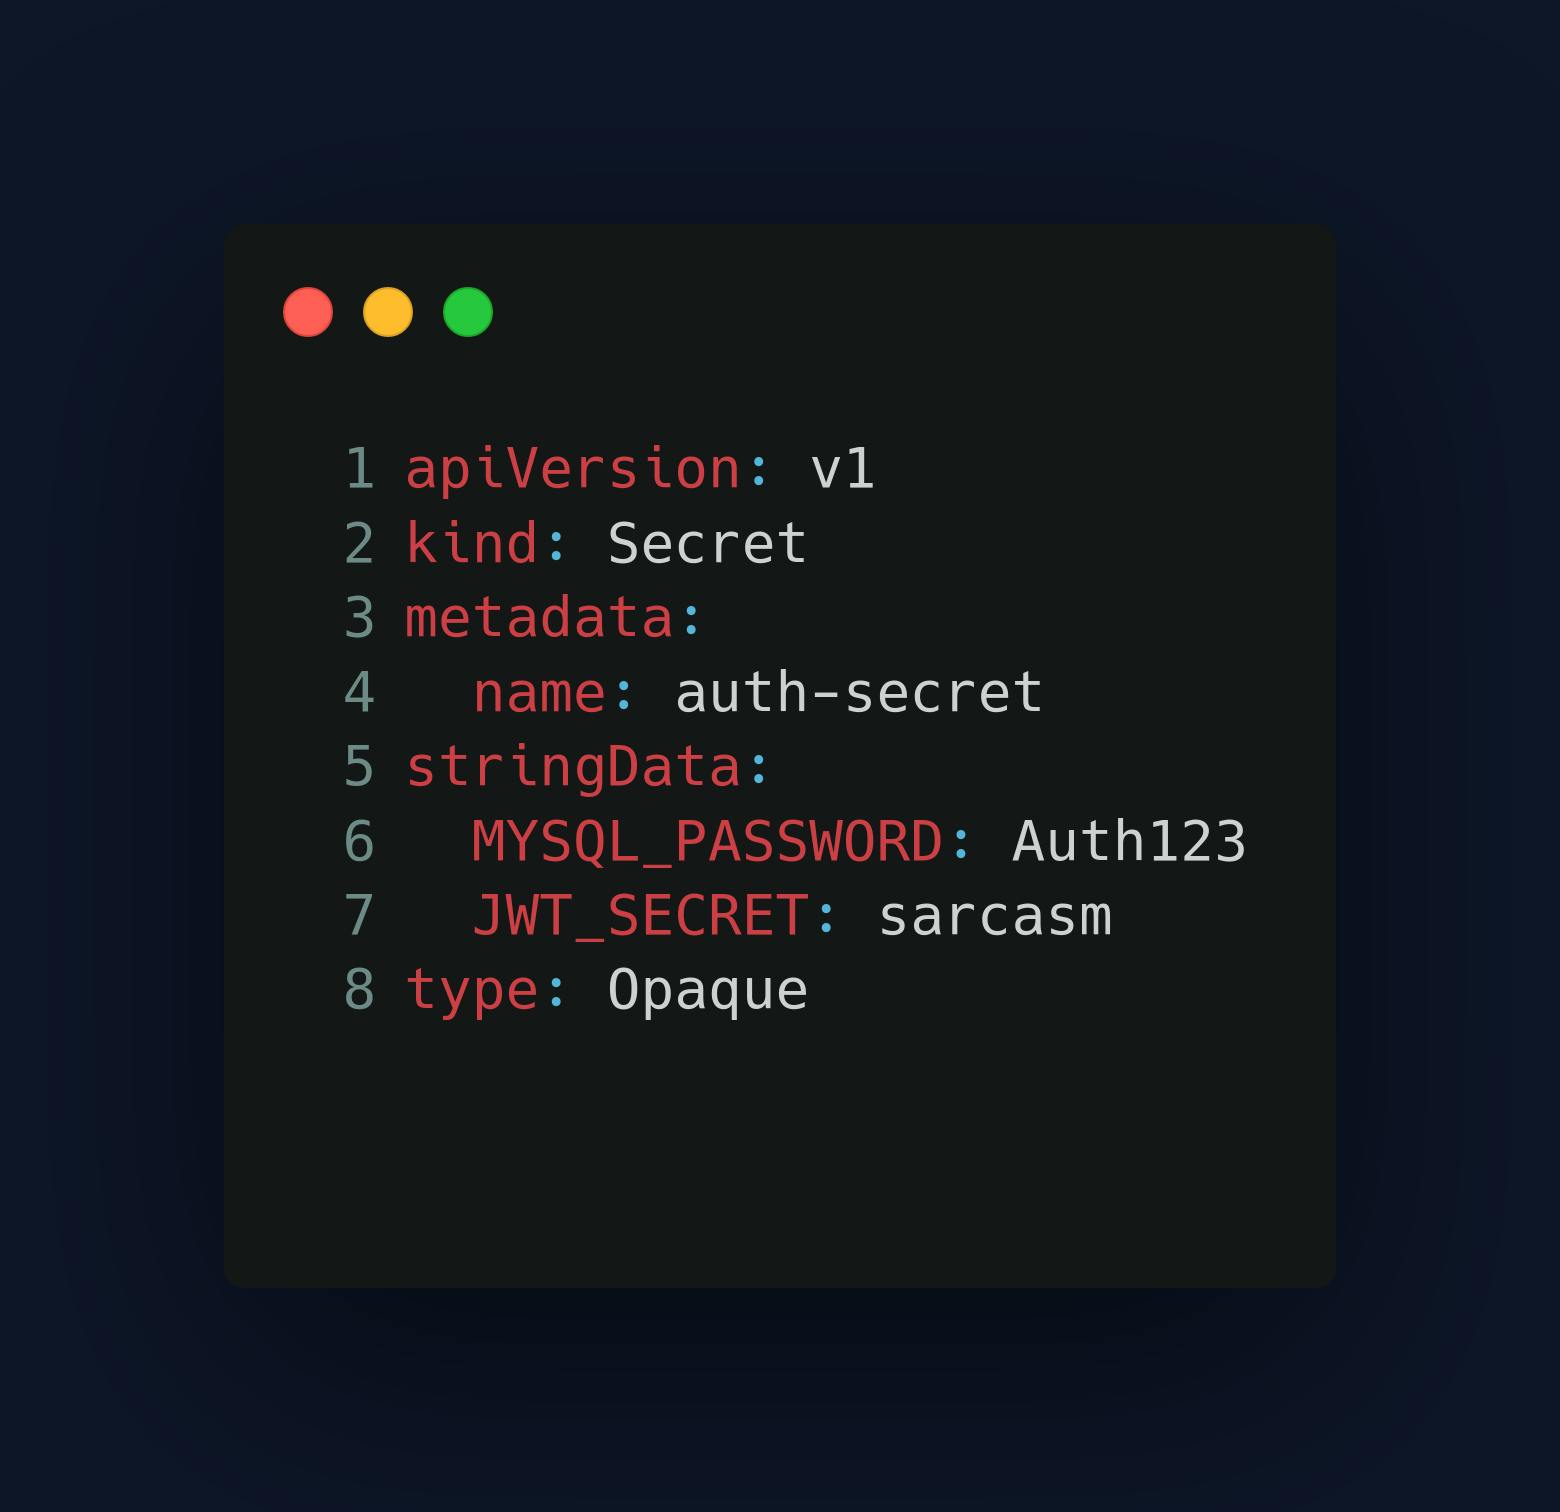
- type: Opaque:- Indicates that the data in the Secret object is arbitrary and unstructured. This is suitable for storing simple key-value pairs like we have in this example.
service.yaml
We are creating a Service object in Kubernetes to expose a set of running pods as a network service that can be accessed by other containers or applications. It provides a stable IP address and DNS name for external clients to access the pods.
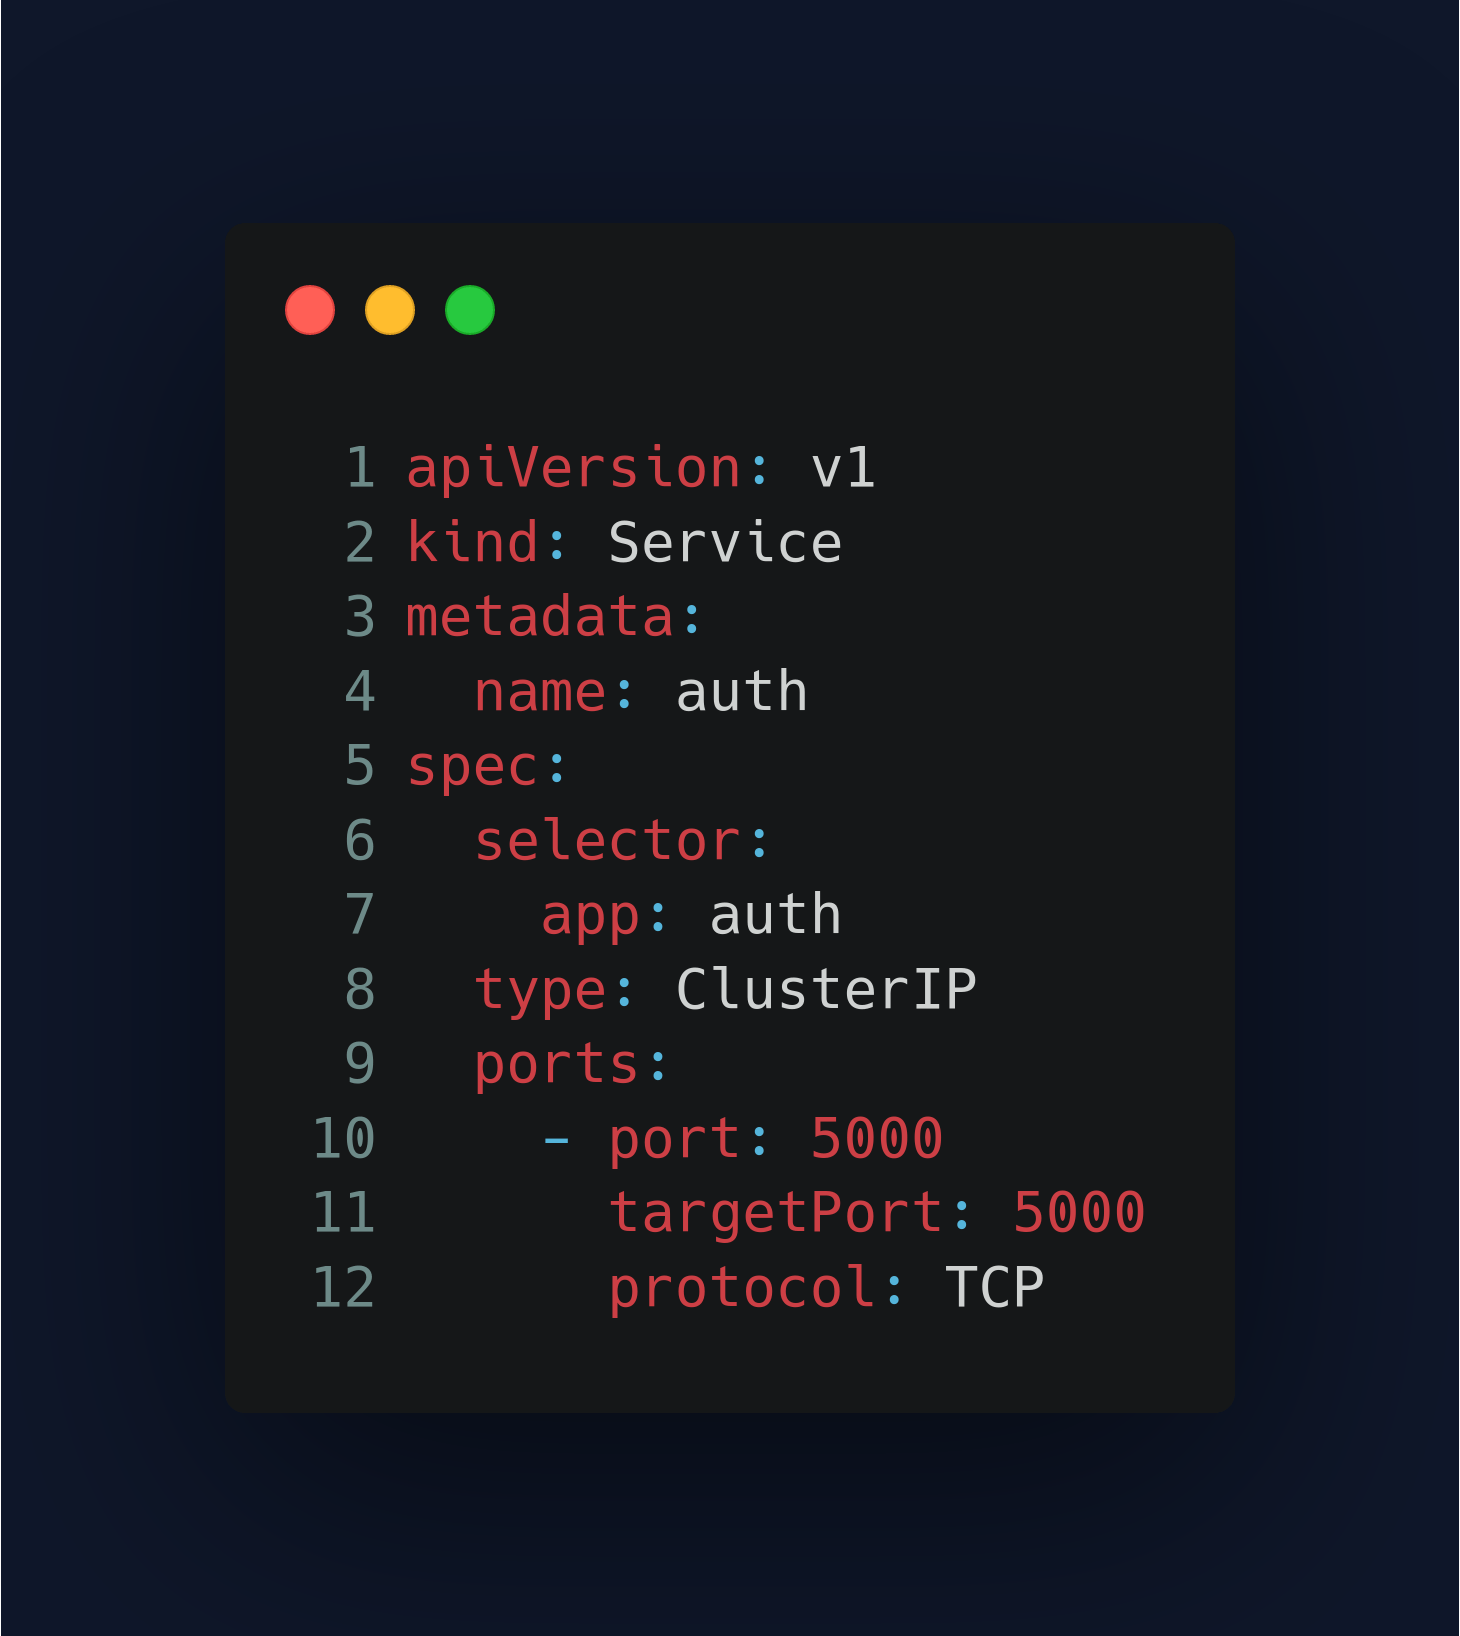
- type: ClusterIP:- The type of the Service is specified as ClusterIP, which means that this Service is only accessible from within the cluster.
Summary 🏁
So, in summary, what you're doing here is deploying an auth service using Kubernetes. There are a few steps involved in this process:
Writing infrastructure code for auth deployment: First, you created a directory called "manifest" and wrote the necessary infrastructure code to deploy the auth service using Kubernetes. This code includes YAML files that specify the Kubernetes resources needed to deploy the service, such as deployment, a service, a config map, and a secret.
Writing the auth service code: In the main directory, you wrote the code for the actual auth service. This code is likely written in a programming language like Python or Go.
Creating a Docker image: To package the auth service code, you created a Dockerfile that specifies the dependencies and runtime environment needed for the service to run. You then built this Dockerfile into a Docker image that contains the auth service code.
Pushing the Docker image to a repository: Once the Docker image was built, you pushed it to a repository on the internet, such as Docker Hub or a private registry.
Pulling the Docker image and deploying it to Kubernetes: Within the infrastructure code in the manifest directory, you wrote code to pull the Docker image from the repository and deploy it to Kubernetes. This code uses the Kubernetes API to interface with the Kubernetes cluster and create the necessary resources for the auth service.
Applying the Kubernetes manifest files: To actually deploy the auth service, all you need to do is run the command "kubectl apply -f ./" from the manifest directory. This command tells Kubernetes to apply the manifest files in that directory, which in turn deploys the auth service.
Overall, this process involves writing code for both the auth service itself and the infrastructure needed to deploy it using Kubernetes. Docker is used to package the service code and deploy it consistently across different environments, while Kubernetes provides the tools to manage and scale the service in production.
Important 👈
Thank you for reading this blog on Microservice Architecture and System Design using Python and Kubernetes. Over the next few weeks, I will be posting a 4-part series in which we will dive deeper into each of the services that we have built.
The first part of this series will focus on the Auth Service, which is responsible for handling user authentication and authorization. The second part will cover the Converter Service, which is responsible for converting data from one format to another.
In the third part, we will explore the Gateway Service, which is responsible for routing requests to the appropriate service. Finally, in the fourth part, we will dive into the Notification Service, which is responsible for sending notifications to users.
We hope that this series will provide you with a comprehensive understanding of Microservice Architecture and System Design using Python and Kubernetes. Stay tuned for the upcoming posts!
I took the initiative to learn in public and share my work with others. I tried my level best in squeezing as much information as possible in the easiest manner. Hope you learned something new today :)
Any feedback for further improvement will be highly appreciated!


